Search

Friday, September 20, 2013

How to create a Service Map with SCOM 2012 SP1 and import into SCSM 2012 SP1

After a nearly 1 year work, we prepared several service maps outside SCOM with "XMind" tool.

When all logical service maps completed, to it was time to create them in SCOM as distributed applications.

After that, I needed to move Management Packs (MP) and Distributed Applications (DA) to SCSM environment.

Written down in brief, lets see whole work in deep:

Designing Service Maps with XMind;

Download Xmind for Windows from http://www.xmind.net/download/win/ and install it for example to your Win7/Win8 PC.

Design your Service, in my Example it is Monitoring Services, where hardware, software, dependent services, customers and settings are core functions of your service. Keep in mind that it is a logical map.


Creating DA's in SCOM 2012;


An example of completed Service Template..


Exporting MP's from SCOM and importing into SCSM 2012;

When you finish your DA's in SCOM now it is time to import related MP's (used MP's corresponding Configuration Items for example you have to import Server 2008 MP if 2008 computer used as CI) into SCSM.

Export your MP including your custom DA from SCOM;


When you try to import your custom DA you will get an error. You have to import .mp type sealed MP's.


Analyze the error, check event viewer SCOM logs and then import dependent MP's to SCSM first.


Importing DA's to SCSM 2012;

After all dependent MP's imported, you can start importing your DA. If you add new CI' depending other MP's you have to import new depending MP's, too. In this step you don't have to seal your custom DA, therefore .xml type will be ok. For a further step, you must seal it for synchronizing it to SCSM Datawarehouse.


Creating SCOM CI Connector and Synchronizing MP's from SCOM;

It is time to create a SCOM CI connector. On Administration Screen click connectors and click "Create connector" and then operations manager CI connector. fill name and server details then create a runas account to connect SCOM. After testing your connection click refresh to get list of configurations going to be imported related to MP's you imported.


Get list of the classes included in your MP;


As you see nothing returns.


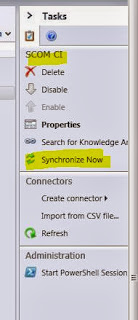
Synchronize it for the first time.


Configuring SCSM allow lists;

After competing first synchronization you have to declare which CI's be synchronized with SCOM. This is the most important step in SCSM side.

This is what I mentioned earlier. We have to tell SCSM to get aware of classes we created in SCOM. With a simple Powershell command list the classes included in your custom MP.


Add these classes to SCSM allow list.


Check your SCSM allow list to be sure;


Configuring Depending Services in SCSM;

From configuration items screen move to all business services this is where your all DA's viewed. As you see from screenshot all CI's and classes allowed in allow list will be listed.

 
SCSM keeps service map properties and users information of business services in its database not in a MP meaning, if you delete your MP and import it again you will find your service map properties and users information areas empty :( So, get well organized before importing your custom MP's.


As a result, I tried to write down main concepts for creating a custom DA in SCOM and moving it to SCSM environment.

Installing VMM 2012 R2 Preview by single server scenario on Windows Server 2012 R2 RTM

I talked about installing VMM 2012 SP1 on my previous blog, now it is time to install VMM 2012 R2 Preview on Windows Server 2012 R2 RTM.

A- Installing Server 2012 R2 RTM

After completing server 2012 RTM installation add accounts to administrator group as in my previous blog and then install .NET 3.5 from Powershell;


B- Completing VMM 2012 preview Prerequisites;

     1) ADK 8.1

          2012 R2 comes with Powershell 4 therefore you don't need to install Powershell 3.0 etc.  It can br   check if desired like;

PS C:\Windows\system32> $host.version
Major  Minor  Build  Revision
-----  -----  -----  --------
4      0      -1     -1

Start Installing as in screenshot;
     2) SQL Server Command line utilities;
          You can look from my previous blog. http://borgamentes.blogspot.com/2013/09/how-to-install-vmm-2012-sp1-and.html

      3) SQL Server 2012 SP1
          You can look from my previous blog. http://borgamentes.blogspot.com/2013/09/how-to-install-vmm-2012-sp1-and.html

C-Installing VMM 2012 R2 Preview

Download System Center 2012 R2 Preview version from http://technet.microsoft.com/en-us/evalcenter/dn205295.aspx and run the exe related to VMM. It extracts setup files to "C:\SC2012 R2 PREVIEW SCVMM" as default path. Then run setup.exe from the path.


Click next and finalize installation.


Monday, September 16, 2013

deploying ProLiant servers as Hyper-V host machines

http://webcache.googleusercontent.com/search?q=cache:ud-QvADp6oIJ:h10032.www1.hp.com/ctg/Manual/c03381509.pdf+&cd=8&hl=en&ct=clnk&gl=tr#6

VMM 2012 using SMI-S provider to manage EMC Clarion cx3-10c

Hello guys,


I was planning to manage our EMC Clarion cx3-10c storage unit with VMM 2012 SP1. I had configured before on VMM 2012. Actually, it is not I a big issue except configuring the SMI-S Provider. Provider configuration is a little bit tricky but don't give up. If you are lucky at first try you will pass that step without any problem.

To mention, my test environment is VMM 2012 SP1 UR3 on Windows Server 2012 with SQL Server 2012 SP1 CU5 on a single server design.

Lets start;
 
First you need to install SMI-S driver on a server able to connect to your EMC storage unit. Selecting "Array Provider" is enough for completing installation.


Then, on the EMC console get/fill the appropiate areas. Also give permission to user you are going to use for SMI-S connection/authorization.


Type https://x.x.x.:x5989/ecomconfig into your browser, enter "admin" and "#1Password"as default username and password.


Using the menu below click "Add User"
 
as seen on menu;
 

After all done on EMC side Run "C:\Program Files\EMC\ECIM\ECOM\bin>TestSmiProvider.exe" and start to configure smiprovider.
 

Accept default values and enter the user name and password you added on ECOM Administration instead of the default ones on the screen shot.

Then enter parameters needed to configure;

addsys
y
1 (it is for Clarion systems)
x.x.x.x (enter the IP addresses of your storage unit IP's you entered steps before)
hit enter for blank
2 (address type meaning IP)
username
password


Use "disco" instead of "addsys" to check autodiscover the EMC storage units.

 
Up to here I have talked about configuring SMI-S and EMC Clarion. Now it is to time move VMM 2012 SP1 console. In VMM 2012 logic is the same but menus are a little bit different, nothing to worry about.
 
First create a "Runas Account" for SMI-S provider, we will use this account integration. Use username and password same as used before in smiprovider.
 
On "Fabric" menu move down to Storage section and right click Providers. Select SMS-S provider and continue,


On next screen enter your SMI-S provider server configured before, select 5988 and SMSI-S CIMXML and the user account created in VMM using browse; If you are unable to configure settings especially can not selecting TCP/IP port there is security update making it gray out. You have to uninstall the update.


Click next;


If you see the device in the list everything is fine, last step is selecting the storage pools and creating and assigning classifications.

Click next and end wizard.


I hope you are happy with all these! take care..


Sunday, September 15, 2013

How to install VMM 2012 SP1 and database on a single server

Hello everybody,

Last week I was only able to write down briefly steps to install VMM environment on a single server. Today, happy to have time, I am going to explain steps in detail.

This is also called as VMM single server deployment scenario. I was waiting VMM 2012 R2 RTM and don't want to use Preview version. therefore,  I decided to use SP1 version this time.
Here are the steps to follow;

1) Installing Windows Server 2012 Ent
2) Installing SQL Server 2012 SP1 and CU5 on the same server (nothing to worry for a test environment)
3) Installing VMM 2012 SP1 and Use a secondary disk for VMM library
4) Installing VMM 2012 SP1 UR3 on top of them


1) Installing Windows Server 2012 Ent
For this blog I wont go through this step not to get it long.

2) Installing SQL Server 2012 SP1 and CU5 on the same server

I will use a dedicated Enterprise SQL 2012 SP1 server. SP1 and CU5 is not mandatory, I just wanted to test it, also.

The first thing you should do is to install .NET Framework 3.5 from Features on Server 2012 Console. Probably you will get an error (http://support.microsoft.com/kb/2734782/en-us). Therefore, you will need to enable it from a command prompt.

Mount installation ISO to d: drive and run the following;
dism /online /enable-feature /featurename:NetFx3 /source:d:\sources\sxs /all

Now we are ready to start installation of SQL server;

Start setup.exe and after passing requirements tests check the following options, maybe you want more to select for testing;


Select default instance and default installation path;


3) Installing VMM 2012 SP1 and VMM Library

You have to complete some prerequisites to be able to install VMM;

1-Creating users and a user group

domain\scvmmadmintest
domain\scvmmsvctest
domain\sqlsvctest
A new Global-Security group: VMMAdmins_test

Add domain\scvmmadmintest and domain\sqlsvctest to VMMAdmins_test group created.


Integration services, full text search and reporting services are not mandatory, I choose them for testing purpose.  Use the "Domain\sqlsvctest" account for SQL Agent and Database Engine. You may choose to use different accounts for other services as you wish.
 
Select collation as "SQL_Latin1_General_CP1_CI_AS"
 
Select "Windows Authentication" and add VMM admins group to SQL administrators. Of course this is for test. You better add only SQL admin here.
 
 
After agreeing next steps finalize the SQL installation. I installed CU5 which was the latest Cumulative Update for SP1 at that date.
 
If you query from SQL management studio with "select @@version" you will get;
 
Microsoft SQL Server 2012 (SP1) - 11.0.3373.0 (X64)
 Jun 29 2013 21:15:12
 Copyright (c) Microsoft Corporation
 Enterprise Edition (64-bit) on Windows NT 6.2 <X64> (Build 9200: ) (Hypervisor)
You may restart your server if desired. I am using hyper-v therefore I took a snapshot at this point before continuing to VMM installation.
 
2-Installing "Assessment and Deployment Kit"

Download  Windows Assessment and Deployment Kit (ADK) for Windows® 8 from http://www.microsoft.com/en-us/download/details.aspx?id=30652 
check only the “Deployment Tools” and “Windows Preinstallation Environment” options.


3-Installing "SQL 2012 Native Client" and "SL 2012 Command Line Utilities"
On the server install the SQL 2012 Native Client and the SQL 2012 Command Line Utilities from
http://go.microsoft.com/fwlink/?LinkId=253555

4) Installing VMM 2012 SP1 and UR3

Installation of VMM 2012 SP1 is as follows;
 
Log on using your domain user account that is a member of the "VMMAdmins_test" group.
Run Setup.exe
Click Install
Select both "VMM Management Server " and "VMM Console"

Accept or change the default install path and click Next. (I had chosen default path)
Enter the server name of SQL server which is the same server (localhost) for our installation. Leave other areas empty and continue.


On the Account Configuration screen, enter the domain account for the VMM service account that you created earlier (DOMAIN\scvmmsvctest). Leave the default to store encryption keys locally for this simple deployment.


On the Port configuration step, accept defaults


for the final step ,on the Library configuration screen, change the library path or accept the default location (I used a 150GB secondary disk for Library on D:)
 
 
Setup will finish soon and you will be able open VMM console for the first time.

4) Installing VMM 2012 SP1 UR3

Using the link http://support.microsoft.com/kb/2836751/tr?lc=1055  download;

Virtual Machine Manager Administration Console Update (KB2858509)
Virtual Machine Manager Server Update (KB2858510)
Virtual Machine Manager Guest Agent Update (KB2858511)
 
 
Install UR3 "server update" and "console update" respectively on VMM server. You will use guest agent update after deploying some virtual machines.
 
Thats all folks!.